
Why Youth Soccer Skills Training at Home Can Transform Your Child's Game
Youth soccer skills training is one of the most effective ways to accelerate your child's development on the field — and you don't need a full team or expensive facility to do it.
Here's a quick summary of what works:
- Start with the basics — ball control and dribbling before passing and shooting
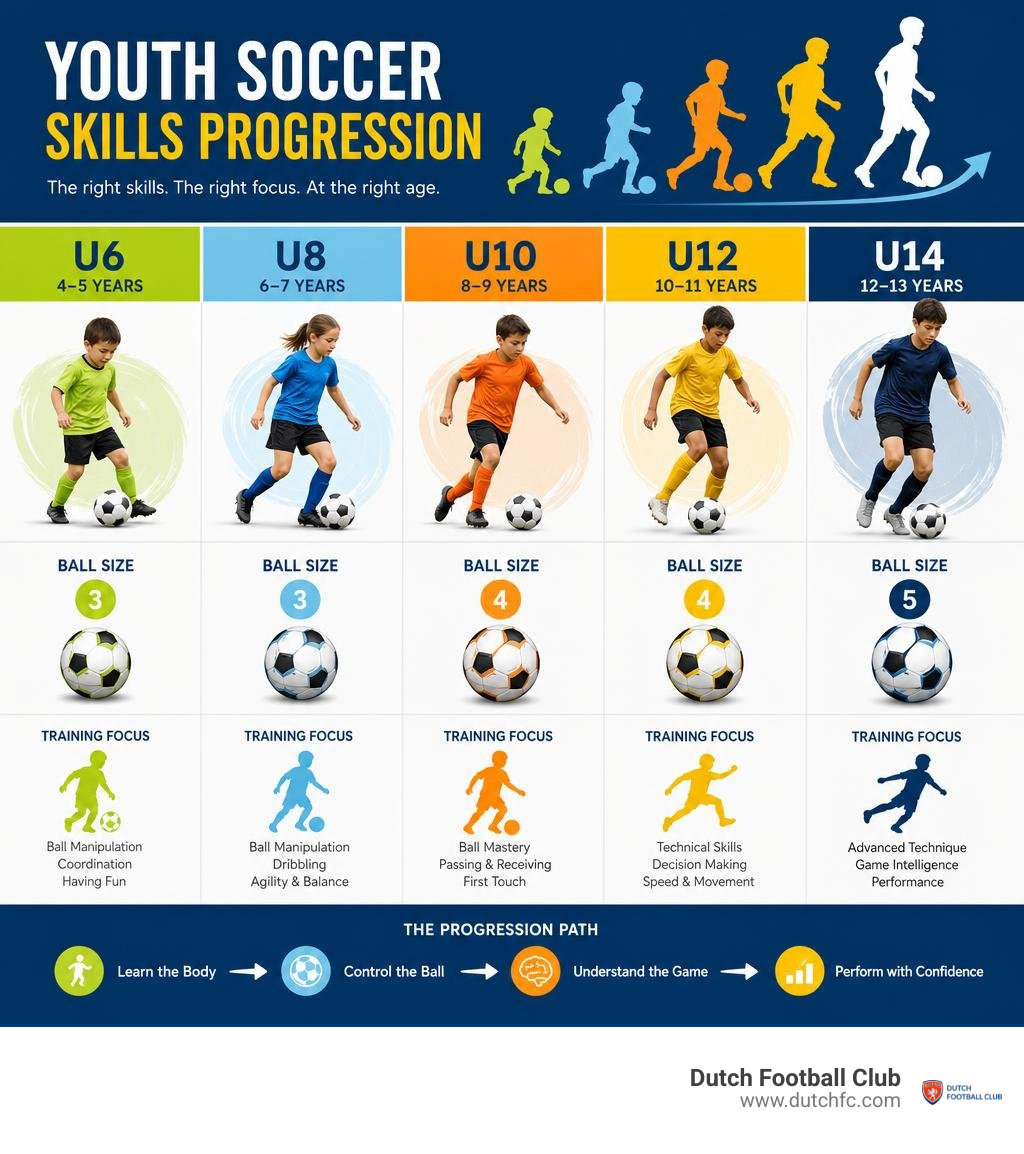
- Match training to age — U6/U8 players use a Size 3 ball and focus on ball manipulation; U10/U12 move to Size 4 and ball mastery; U13+ use a Size 5 and refine advanced technique
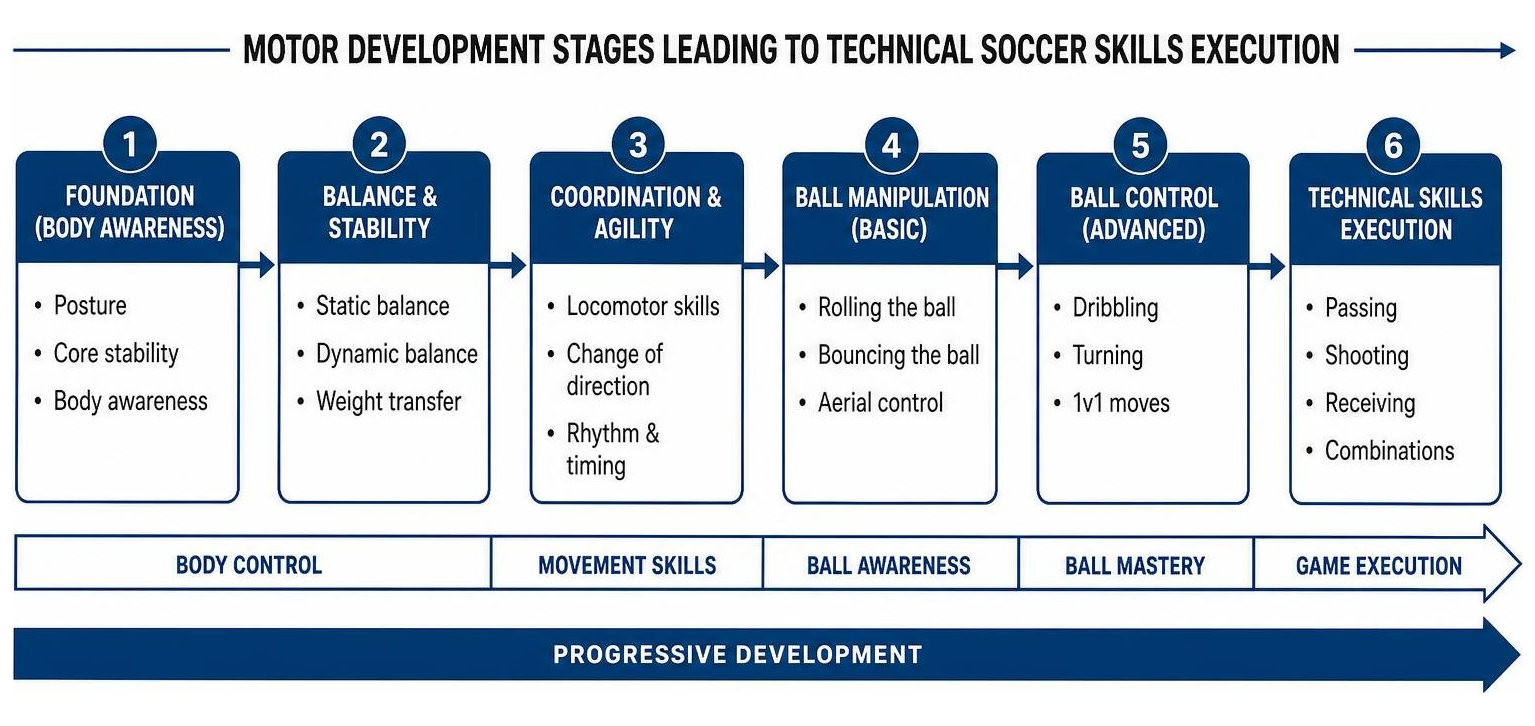
- Build on motor development — kids need body control before ball control
- Use short, focused sessions — research supports distributed (short, repeated) practice over long, infrequent sessions
- Progress ball work in order — rolling first, then bouncing, then aerial balls
- Keep it fun — kids who enjoy training stay in the game longer
The truth is, the game will show you what the player needs to practice. Watching your child play is the best diagnostic tool you have as a parent or coach.
I'm Wilco Ravestijn, spokesperson for Dutch Football Club in Frisco, Texas, where our Dutch-style Total Football approach shapes how we think about youth soccer skills training at every age level. I'll walk you through exactly how to build a smart, progressive home training routine for your child.
The Science of Motor Development in Youth Soccer Skills Training
To design an effective home training program, we must first understand how a child's body develops. In sports science, we look closely at motor development, which naturally progresses from the head down to the legs (known as the cephalocaudal trend). Because full control of the lower limbs is achieved last, a child must first master general body balance, coordination, and agility—movement education—before they can successfully control a soccer ball with their feet.
When we look at motor development, we divide movements into three primary categories:
- Locomotor movements: Running, jumping, skipping, and leaping.
- Nonlocomotor movements: Bending, twisting, balancing, and turning.
- Manipulative patterns: Throwing, catching, and—most importantly for soccer—kicking.
At Dutch Football Club, we emphasize that athletic coordination (gross motor skills) must precede complex footwork (fine motor skills). If a child cannot balance on one foot while twisting their torso, they will struggle to execute a clean step-over or a side-volley.
Furthermore, scientific research shows that how we structure practice sessions directly impacts how well children retain these movements. In a landmark study on youth player development, Effects of a Short-Term Soccer Training Intervention on Skill Course Performance in Youth Players: A Randomized Study, researchers evaluated the impact of supplementary training sessions on young athletes.
The study highlights a few critical concepts for home training:
- Contextual Interference: Introducing variable practice (changing the drills, angles, and speeds) rather than blocked practice (doing the exact same drill repeatedly) dramatically improves long-term motor learning.
- The Power Law of Practice: Technical skill improvement is highly rapid at lower proficiency levels, but gradually plateaus as players mature (typically around age 14 to 15). This makes the golden window of ages 6 to 12 absolutely critical for home skill acquisition.
- Distributed Practice: Short, highly focused, and frequent training sessions (e.g., 20 minutes a day, four times a week) yield far better skill retention than one long, exhausting two-hour session on the weekend.
Age-Appropriate Milestones for Youth Soccer Skills Training
Kicking a soccer ball is not a single, simple action; it is a continuous series of movements that develops in four distinct stages from early childhood to around age eight:
- Stage 1 (typically achieved by age 2): The child pushes a stationary ball with no leg windup and steps backward immediately afterward to regain their balance.
- Stage 2 & 3 (achieved between ages 4 and 6): The child starts using a small backswing and can run up to a stationary ball, though their balance remains rigid. Most boys achieve Stage 3 by age four and a half, while most girls reach it by age six.
- Stage 4 (achieved by age 7 for boys, and age 8 for girls): The child demonstrates a mature kicking pattern, including a rapid run-up, a leap before the kick, and a hop on the plant leg during the follow-through.
Another critical biological factor is visual tracking acuity. Prior to age 9, a child's visual tracking systems are not fully developed. They literally struggle to judge the flight, speed, and trajectory of a ball in the air. By approximately age 10, visual tracking achieves an adult pattern, allowing them to accurately track flighted passes, high punts, and long-distance shots.
To align with these developmental milestones, we must use the correct equipment and training focus for each age group:
| Age Group | Ball Size | Primary Training Focus | Developmental Milestone |
|---|---|---|---|
| U6 | Size 3 | Ball Manipulation (Tapping, rolling, basic coordination) | Stage 1 & 2 Kicking; Focus on single-player play |
| U8 | Size 3 | Propelling the Ball (Dribbling with direction, basic passing) | Stage 4 Kicking; Visual tracking still developing |
| U10 | Size 4 | Mastering the Ball (First touch, directional receiving, fakes) | Visual tracking achieves adult pattern (Age 10) |
| U12 | Size 4 | Feints, Aerial Balls, & Spatial Awareness | Refined coordination; Ready for tactical transitions |
| U14 | Size 5 | Advanced Passing, Heading, & Positional Play | Peak technical acquisition before teenage plateau |
Designing Home Drills Using Ball Properties for Youth Soccer Skills Training
To make home practice highly effective, we use the physical properties of the soccer ball to design a progressive training environment. A ball behaves in four primary ways: rolling, bouncing, flight, and spin.
We must always design our training progressions to match this sequence of difficulty:
- Rolling Balls: The easiest to control. Keep drills on flat grass or carpet, focusing on receiving and passing a smooth, rolling ball.
- Bouncing Balls: Introduces vertical unpredictability. Practice controlling the ball immediately after it hits the ground.
- Flighted Balls: The most difficult. Requires tracking the ball through the air and selecting the correct surface (chest, thigh, foot) to control it.
Understanding the physics of the ball also helps players master spin and flight. A soccer ball has horizontal and vertical axis lines.

- Striking below the horizontal axis lifts the ball into the air (essential for chip passes and long drives).
- Striking above the horizontal axis keeps the ball low or drives a bouncing ball back down to the ground.
- Striking to the left or right of the vertical axis imparts spin (swerve), allowing players to bend passes around imaginary defenders.
Mastering Ball Control: Dribbling, Fakes, and Feints
To build true confidence on the ball, a player must master ball manipulation. At Dutch Football Club, we emphasize that players should achieve high competence in basic, orthodox techniques before trying to learn highly complex, spectator-pleasing tricks. Our dedicated Skills programs are built on this exact philosophy.
A common point of confusion for young players is the difference between a fake and a feint:
- A Fake: Involves moving the ball itself to deceive an opponent. For example, a "fake pass" or "fake shot" where the foot swings toward the ball, stops short, and then drags the ball in a different direction.
- A Feint: Deceives the defender using only body movements without touching the ball. A classic example is the shoulder drop or body swerve, where the player acts as if they are going left, causing the defender to shift their weight, before exploding to the right.
To develop cunning and creativity on the ball, we encourage players to practice "shadow dribbling" in the backyard. Have them imagine a defender in front of them and practice combining a body feint (dropping the left shoulder) with a quick exit touch using the outside of the right foot.
The Three Phases of Technical Execution
Every soccer technique—whether it is a pass, a shot, or a dribble—consists of three distinct phases:
- The Preparation Phase: This includes the approach run, the positioning of the body, and the placement of the support (plant) foot. This phase is most often overlooked by young players. They focus so much on striking the ball that they plant their foot too far forward, too far back, or pointing in the wrong direction, leading to a poor result.
- The Contact Phase: The exact moment the foot meets the ball. This requires locked ankles, proper body posture, and striking the correct part of the ball.
- The Follow-Through Phase: The movement of the kicking leg and body after contact, which dictates the power, accuracy, and trajectory of the ball.
When analyzing your child's technique at home, always start by observing their feet and work your way up to the head. Is their support foot pointed at the target? Is their center of gravity low to help them change direction quickly? Correcting the preparation phase solves 90% of technical errors.
Passing and Receiving Mechanics for Solo Practice
You do not need a partner to master passing and receiving. A sturdy brick wall, a backyard fence, or a dedicated soccer rebounder makes the perfect training partner.
When practicing passing, focus on these three foundational techniques:
- The Push Pass (Inside of the foot): The bread and butter of possession. The support leg should plant about 6 inches to the side of the ball, with the toes pointing directly at the target. The striking foot is turned outward at a 90-degree angle, ankle locked, striking the middle of the ball.
- The Instep Drive (Laces): Used for power passing and shooting. The support foot plants slightly further back, the toes of the kicking foot point down, and the laces strike the center of the ball. The body should lean slightly forward to keep the ball low.
- The Chip Pass: Used to loft the ball over an opponent. The support foot plants slightly behind the ball. The kicking foot stabs downward into the turf directly underneath the ball's horizontal axis, with almost no follow-through.
To set up a highly effective solo passing station at home, we recommend gathering a few basic pieces of equipment:
- A soccer rebounder or a smooth brick wall.
- 4-6 low-profile cones to create passing "gates" (targets to pass through).
- A tennis ball or size 1 mini-ball (practicing passing and catching a smaller ball rapidly refines fine motor coordination).
Receiving Techniques: Cushion vs. Wedge
A player's first touch is the ultimate indicator of their technical skill. When receiving ground passes, bouncing balls, or aerial balls, we teach two primary techniques:
- The Cushion Technique: This involves absorbing the ball's momentum. As the ball arrives, the player slightly withdraws the receiving surface (the inside of the foot, thigh, or chest) at the moment of impact. Think of it like catching an egg; you pull your hands back to keep it from breaking.
- The Wedge Technique: Instead of absorbing the momentum, the player uses a rigid surface to direct the ball downward or outward into space. For example, using the inside of the foot like a wedge to redirect a bouncing ball firmly into the ground so it settles quickly at their feet.
We always teach players to take their first touch across their body with their inside foot to maintain an open body shape, allowing them to see the entire field. If there is no pressure, the first touch should go forward into space; if under pressure, the touch should go sideways or backward to shield the ball. For more deep dives into technical execution, check out our Articles & Insights page.
Advanced Techniques: Heading, Tackling, and Throw-Ins
As players transition from U10 to U14, they must begin mastering the physical and tactical aspects of the game, including aerial play, defensive tackling, and restarting play from the touchline. To see how these skills fit into a complete seasonal curriculum, you can view this comprehensive Training Program guide.
Safe Heading Progressions and Age Guidelines
Safety is our absolute priority. Because young brains and neck muscles are still developing, we strictly follow age-appropriate safety guidelines for heading:
- U6 & U8: No heading training of any kind.
- U10: Extremely limited. No more than 1 light activity (0-3 times per season), using soft foam balls, balloons, or light volleyballs.
- U12: Up to 1 structured activity per week using light balls.
- U14: Up to 2 activities per week, transitioning to standard Size 5 balls.
When teaching heading to older players, always use a progressive approach:
- Stage 1: The player holds a light ball in their own hands, bringing it to touch their forehead to get comfortable with the contact point (the hairline).
- Stage 2: A parent tosses a light ball from 3 feet away. The player focuses on keeping their eyes open, mouth closed, and using their neck and core muscles to power through the ball.
- Stage 3: Introduce proper jumping mechanics—taking off from one foot, landing softly on the balls of both feet with bent knees to prevent knee injuries.
For more safety resources and guidelines, visit our Resources section.
Defensive Tackling and Throw-In Mechanics
Defending is an art that requires excellent timing and body mechanics. At home, players can practice the body positioning for two essential tackles:
- The Block Tackle: Used when facing an opponent head-on. The player lowers their center of gravity, plants their support foot firmly next to the ball, locks the ankle of their tackling foot, and strikes the center of the ball with the inside of the foot just as the opponent tries to dribble.
- The Slide Tackle: A last-resort recovery move. The defender slides on the thigh and hip of the leg closest to the ground, extending the top leg to cleanly sweep the ball away. Never practice slide tackles on dry, hard ground or concrete—only on wet, lush grass.
Additionally, throw-ins are an under-practiced restart that can easily turn into a turnover if executed poorly. The essential mechanics of a legal throw-in are:
- The player must face the field of play.
- Both feet must remain on the ground (on or behind the touchline) at the moment of release.
- The ball must be delivered from behind and over the head using both hands with equal force.
To make throw-in practice engaging at home, set up "Throw-In Bowling." Place three plastic bottles or cones 10 yards away and have your child try to knock them over using proper overhead throw-in mechanics. It builds upper body strength and precision! If your child is interested in how goalkeepers handle these throws and aerial distributions, they can explore our specialized Goalkeeper Training program.
Frequently Asked Questions about Youth Soccer Skills Training
What is the difference between technique and skill in soccer?
Technique is the mechanical execution of a movement (like passing or shooting) in a controlled, pressure-free environment. Skill is the ability to select and execute that technique under the pressure of opponents, limited space, and rapid decision-making in a real match.
Why do children struggle to track high, flighted balls before age 10?
Children's visual tracking acuity—the ability of the eyes and brain to calculate the speed, depth, and trajectory of an object moving through three-dimensional space—does not fully mature until around age 10. Before this age, high flighted balls appear highly unpredictable to them.
How can parents keep home soccer training fun and prevent burnout?
According to sports psychology research (such as the classic Ewing & Seefeldt study), the primary reasons children play sports are to have fun, improve their skills, experience excitement, and feel a sense of autonomy. Keep home sessions short (15-20 minutes), focus on self-improvement rather than perfection, use gamified challenges (like hitting targets), and let your child decide when they want to practice.
Conclusion
Mastering youth soccer skills training at home is all about consistency, age-appropriate progressions, and keeping the process highly engaging. By understanding the science of motor development and focusing on clean, fundamental mechanics, you can help your child build a lifetime of confidence on the ball.
At Dutch Football Club in Frisco, Texas, we are dedicated to providing a low-cost, high-value development model rooted in the world-famous Dutch "Total Football" philosophy. We believe in developing creative, versatile players who understand how to control both their bodies and the ball.
If you want to take your child's training to the next level with professional coaching, outstanding facilities, and an inspiring environment, explore our upcoming Camps and academy programs. Let's build the future of soccer together!